안녕하세요 오늘은 아두이노의 모터실드의 사용법을 알아보도록 하겠습니다.
모터 쉴드에 대한 기술지원이 필요하시다면, 다음의 링크를 방문해주세요.
바로가기
YFROBOT MOTOR SHIELD
[모터실드 소개]
YFROBOT의 모터실드는 DFROBOT의 L298P드라이버를 사용하여 모터를 제어합니다.
모터를 제어하기위해 총 4가지 핀을 사용합니다.
4~7번까지의 핀을 사용하여 모터를 제어하게
됩니다.
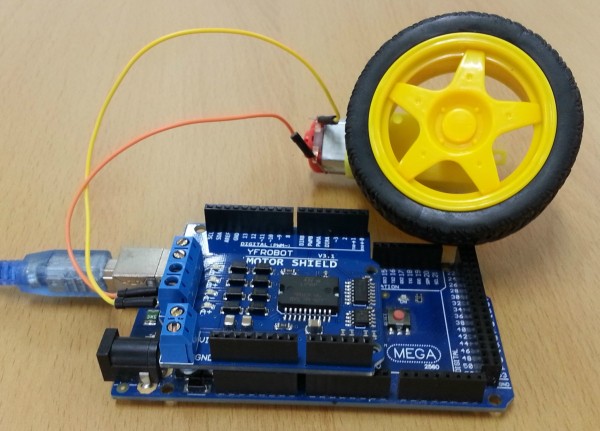
우리들은 실드를 사용하기 때문에 특별히 아두이노와 실드사이 배선을 할필요없이 실드와 모터를 연결하여서 사용하시면 됩니다.
[배선하기]
실드를 아두이노에 장착하시고,
A-와 A+
, B-와 B+는 각각 모터에 연결이됩니다.
[샘플코드]
#1 가감속 제어
/**set control port**/
const
int E1Pin = 5;
const
int M1Pin = 4;
const
int E2Pin = 6;
const
int M2Pin = 7;
/**inner definition**/
typedef struct
{
byte enPin;
byte directionPin;
}MotorContrl;
const
int M1 = 0;
const
int M2 = 1;
const
int MotorNum = 2;
const
MotorContrl MotorPin[] ={ {E1Pin,M1Pin}, {E2Pin,M2Pin} } ;
const
int Forward = LOW;
const
int Backward = HIGH;
/**program**/
void
setup()
{
initMotor();
}
void
loop()
{
int
value;
/**test M1 **/
setMotorDirection(M1,Forward);
setMotorSpeed(M1,100);
delay(1000);
setMotorSpeed(M1,50);
delay(1000);
}
/**functions**/
void
initMotor( )
{
int
i;
for
( i = 0; i < MotorNum; i++ )
{
digitalWrite(MotorPin[i].enPin, LOW);
pinMode(MotorPin[i].enPin, OUTPUT);
pinMode(MotorPin[i].directionPin, OUTPUT);
}
}
/** motorNumber: M1, M2
direction: Forward,
Backward **/
void
setMotorDirection( int motorNumber, int direction )
{
digitalWrite( MotorPin[motorNumber].directionPin, direction);
}
/**
speed: 0-100 * */
inline
void setMotorSpeed( int motorNumber, int speed )
{
analogWrite(MotorPin[motorNumber].enPin, 255.0 * (speed/100.0) ); //PWM
}
#2 방향제어
/**set control port**/
const
int E1Pin = 5;
const
int M1Pin = 4;
const
int E2Pin = 6;
const
int M2Pin = 7;
/**inner definition**/
typedef struct
{
byte enPin;
byte directionPin;
}MotorContrl;
const
int M1 = 0;
const
int M2 = 1;
const
int MotorNum = 2;
const
MotorContrl MotorPin[] ={ {E1Pin,M1Pin}, {E2Pin,M2Pin} } ;
const
int Forward = LOW;
const
int Backward = HIGH;
/**program**/
void
setup()
{
initMotor();
}
void
loop()
{
int
value;
/**test M1 **/
setMotorDirection(M1,Forward);
setMotorSpeed(M1,50);
delay(1000);
setMotorDirection(M1,Backward);
setMotorSpeed(M1,50);
delay(1000);
}
/**functions**/
void
initMotor( )
{
int
i;
for
( i = 0; i < MotorNum; i++ )
{
digitalWrite(MotorPin[i].enPin, LOW);
pinMode(MotorPin[i].enPin, OUTPUT);
pinMode(MotorPin[i].directionPin, OUTPUT);
}
}
/**
motorNumber: M1, M2
direction: Forward,
Backward **/
void
setMotorDirection( int motorNumber, int direction )
{
digitalWrite( MotorPin[motorNumber].directionPin, direction);
}
/**
speed: 0-100 * */
inline
void setMotorSpeed( int motorNumber, int speed )
{
analogWrite(MotorPin[motorNumber].enPin, 255.0 * (speed/100.0) ); //PWM
}
[함수 살펴보기]
샘플로 제공된 소스코드의 아래쪽을 보시면 다음과 같은 제어 함수 들이 있습니다.
/**
motorNumber: M1, M2
direction: Forward,
Backward **/
void
setMotorDirection( int motorNumber, int direction )
{
digitalWrite( MotorPin[motorNumber].directionPin, direction);
}
/**
speed: 0-100 * */
inline
void setMotorSpeed( int motorNumber, int speed )
{
analogWrite(MotorPin[motorNumber].enPin, 255.0 * (speed/100.0) ); //PWM
}
setMotorDirection은 모터의 방향을 제어할 때 사용됩니다.
첫번째 인자값인 motorNumber에 제어할 모터를 , 두번째 인자값인 direction에 Forward, Backward를 넣습니다.
setMotorSpeed는 모터의 속도를 제어할 때 사용됩니다.
첫번째 인자값인 motorNumber에 제어할 모터를 , 두번째 인자값인 direction에 0~100까지의 값을 넣어줍니다.
지금까지 읽어주셔서 감사합니다!


최신댓글